Consultation
To better serve the equine industry both locally, across Australia and abroad, we offer one-on-one consultations. To book a consultation, complete the form below, pre-pay for your session here, send the requested images and video and we will be in touch to book the session. Consultations can be via Zoom, telephone and, if travel and schedules allow, in-person. Please see the below instructions to prepare, photograph and/or video your horse and their hooves for the best outcomes for an online consultation.
What you need for an online consultation:
❖ Welcome, I am looking forward to helping you and your horse online. From this online consultation you will gain valuable insights into your horse’s hooves, any visible pathologies and limb conformation and how these factors impact performance, comfort, temperament, and long-term soundness. I will be able to suggest how to adjust your trim, environment, diet, and nutrition and help you improve your horse’s overall well-being.
This service is suitable for all horse owners/riders/trainer/therapists, at any level. I am not a vet and therefore will not be making any diagnoses. Should I think it is warranted I will suggest veterinary intervention, or if you are in anyway unsure then please make an appointment with your veterinarian.
Please read the following instructions carefully, the quality of our session depends on the quality of the information you provide to me.
❖ Below are instructions on the video and images I need to see, please read, and follow this as closely as you can.
❖ Please send your videos and images at least 2 days before our session so that I can have them loaded into my system ready to share via my screen, in our meeting, so we can both see them and discuss.
❖ You will need to prepay for your session, please visit this page to pay for your consultation.
❖ Refunds will be at my discretion and generally will only be available as a credit towards to a future consultation. For valid reasons, I will apply a credit, but it will be entirely at my discretion and dependent on the work already done in assessing videos and photographs.
❖ Our meeting will be via Zoom, this is free for you to use but it does use data, so it is up to you whether you use Wi-Fi or Mobile. You need to download the Zoom app prior to the meeting.
The meeting will commence once we have both logged into the ‘meeting room’. I will have my video and audio on, you will need your audio on but if you don’t have a strong enough signal, or you feel you are not presentable, you can turn off your video. Of course, if we are doing this live with your horse, you will require your video activated. It is advisable to run a zoom test first to see if you can successfully work remotely.
❖ Consults generally run for about 45 to 60 minutes. Possibly longer if required. Time permitting, we may be able to continue, extra time will be billed at $25 per half hour or part there-of.
❖ I am happy to look at your horse live, or via previously uploaded videos and images. The quality of our result will be largely dependent on the quality of your videos and images and the information you provide via the online form.
Preparing for Your Online session:
❖ If we are going to look at your horse live, you will, of course, need another person to assist you while we discuss to hold the phone and video while you hold the hoof… Quite tricky and tiring.
❖ Remember setting up will take time so be organised with your gear and horse in a safe well-lit suitable clean environment.
❖ Once you have read the information sheet on the video and images we need, then either upload them to “WeTransfer”, or upload to YouTube and send me the link. To find that link, click on your videos, to the right of the thumbnail of the video you want to share, there are three dots, click on those dots and it will offer you a shareable link to copy. Photos can be emailed or also uploaded to WeTransfer or another suitable program.
❖ Please familiarise yourself with the requirements to get the most of this consult and try zoom to ensure you are comfortable with the program.
How to Video and Photograph your Horse for the Online Assessment
❖ I will need clear footage and photographs/radiographs. Radiographs are of great benefit. Remember that I am losing several perspectives when working online as opposed to physically being with the horse. (Depth of field, touch and believe it or not smell).
❖ Make sure the video camera operator doesn’t have the shakes.
❖ Have your camera in Landscape for the side-on views of your horse, only have it in Portrait for the front on or the hind end views, for the hoof itself this doesn’t really matter.
❖ If you make opt to make a video of each hoof, a separate short video will be easier to upload than one large video.
❖ Only do things you are capable of, and you feel safe doing. Do the best you can with the area and equipment that you have available.
❖ Have the horse in-hand on a comfortable or soft surface, paddock, or arena. If your horse has laminitis, or any other injuries, please do not force the horse to trot or walk etc.
1. Walk the horse away from the camera, in a straight line, for 20m, then turn and walk back again.
2. Walk the horse side-on to the camera for 20m, turn and walk back the other way and then from the other side (so I can see both sides of the horse).
3. Trot (if it is safe to do so) the horse away from the camera, in a straight line, for 20m, then turn and trot back again.
4. Trot the horse side-on to the camera for 20m, first left to right and then right to left.
5. Walk the horse in a 3 to 5m circle for 2 circuits to the left, you can lead or send your horse around.
6. Repeat in the other direction.
7. In-hand while standing on a firm surface, walk around the horse with the video camera showing me from in front, behind and each side, it is important I can see the feet and the topline. This can also be done with either your camera or video.
8. Take photos of your horse’s legs, showing the feet, from in front, behind and from each side.
How to take good photographs of hooves specifically:
Taking good hoof photos is crucial to getting a good evaluation of your horse’s hooves. Frequently people need to redo photographs because we cannot see the level of detail required. Dirty hooves, blurry pics, and bad angles and poor or dappled light are the biggest issues. It is virtually impossible to assess and comment if the photographs are substandard.
Perspectives can be completely different depending on camera placement (especially hoof angles). Here are some pointers to help.
1. Location
You need a firm (so that the hoof doesn’t sink into it) and flat surface. Concrete, rubber mats or hard packed dirt is suitable. Lighting is also important – try to avoid dappled light or an area where there is direct sunlight such as an open doorway or any bright light behind the hoof. Natural, even light is best but using a flash can also work. A dark background helps.
2. Clean area
Sweep the floor of hay and/or bedding. They can distort the focus and make for blurry photos.
3. Clean the hooves thoroughly
Pick the hooves out and use a wire brush to thoroughly clean out all the cracks and crevices. If the foot still looks dirty, then try soaking in warm water for a few minutes and then scrub with a brush to get rid of every speck of dirt. Then thoroughly dry the foot with a towel. Clean the floor again if you made a mess cleaning the hooves.
4. Taking the Pictures
For majority of these shots the camera needs to be on the ground, otherwise there will be distortion. If you have any specific problems with the hooves, you can also include additional photos of them.
LABEL your photos. Take them in order so you don’t get confused as to which is which. (I generally zoom out after each shot; this reminds me where I am and which hoof, I was looking at). Make sure the horse is bearing weight on the hoof you are taking a photo of (for lateral/medial, dorsal and heels on the ground shots).
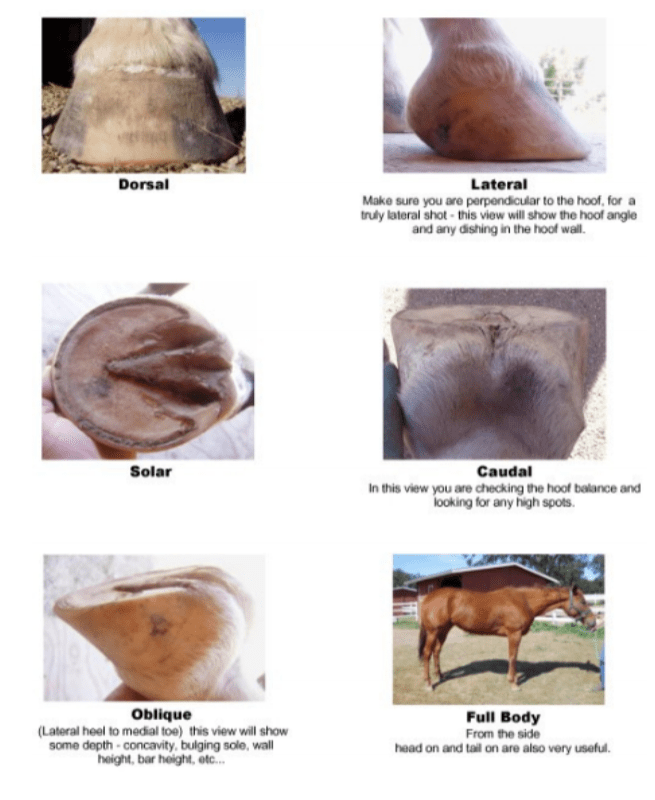
Lateral shot – taken from the side of the hoof with the camera on the ground and aiming the camera at the middle of the hoof. The camera must be parallel to the leg and try to include the pastern and fetlock so that the angle can be accurately assessed.
Medial shot – same as the lateral shot but taken from the opposite side of the horse so you are viewing the inside side of the hoof.
Dorsal (Toe, front looking towards the hind quarters) shot – again taken with the camera on the ground and aiming the camera at the middle of the hoof. Make sure the horse’s leg is as square over the hoof as possible.
Caudal (Heels in the air shot) – you need to hold the hoof while taking the photo. Hold the pastern in your hand with your thumb gently pressing into the back of the pastern. Encourage the horse to relax the leg and let the hoof hang down. The first couple of times you try this the horse will probably think you want him to put the hoof down, so be patient. Gently rotating or wiggling the leg will help the horse to relax. Once you and your horse are comfortable with this you can then line the camera up with the heels and move it backwards and forwards until you can just see the toe slightly as well. I suggest you take a few shots in varying positions to ensure you get it right. This is a very useful shot for assessing overall balance.
Sole shot – Hold the camera parallel to the hoof and try to keep it fairly square on too. Make sure you include the heel bulbs.
Oblique (Concavity) shot– a nice shot to illustrate concavity. Hold the camera about 8 inches above and to the side of the hoof at an angle of about 45 degrees. Again, experiment a bit and take a few shots to be sure to get a good one.
Full body shot – taken from the side with the horse standing in his/her normal position (Don’t stand him/her up square just for the photo).
Please complete this form to initiate an online consultation and go to this page to pay for your session. You will receive an email confirmation to arrange the session date and time.
